
Okay, here is a pic of what the old bathroom looked like. Before you ask, yes, that door was broken when I bought the place. The place reaaaaaaly looked like crap and needed to be re-done, but the previous owner (PO) didn't think anything was wrong with it and was asking top-dollar for the place because he saw renovated places in the neighborhood selling for a lot of money.
Well, smarty, if you think it's that easy to fix up, you should do it yourself. I eventually talked the guy down to a reasonable amount. My realtor couldn't believe my negotiation skillz. And I got the place for what new 1BR luxury condos were selling for in the area.
Oh, by the way, you probably can't tell from here, but that floor was reaaaaallly fcuked up and unlevel. It was 2.5 lower where the toilet is than it was on the other side of the bathroom. I had it leveled with cement before I installed the floor tile.
Here is a pic of the old shower (it's a small bath, so it's hard to get a pic of the whole room. The ugly 50s bright yellow tile and toilet was too much to look at. I think that prozak hadn't been invented back then so people dealt with depression by decorating their houses in annoying bright, happy colors.


Okay, the Plumbing Monkey installed greenboard in the shower. That's technically, okay by the building code, but I wanted something a little better, so that it wouldn't have to be re-done in 20 years. So I, myself, installed 1/4" cement board over the green board. I don't like the idea of adding it after the tub has already been installed (b/c sometimes it looks like the walls are swallowing up the tub) but I used thin cement board so it looked okay. Plus, this stuff (hopefully) will last another 100 years and future gerenarations can marvel at my friggin' marble-setting skillz.
I didn't want to rip out the greenboard b/c it would be more time and money, plus, I was already thinking of firing the guy, so I didn't want to pay him to do stuff I could do myself (like adding the cement board over the greenboard), which is why I had them do the heavy unskilled labor stuff (like knocking down walls or carrying in drywall deliveries).

Here i sealed the gaps between the cement board with thinset and added the ledger board so that I could start laying the tile straight. The tub wasn't perfectly level (thanks to the plumbing monkey) but I wanted the tile to be level and plumb. I knew this would come back to haunt me.
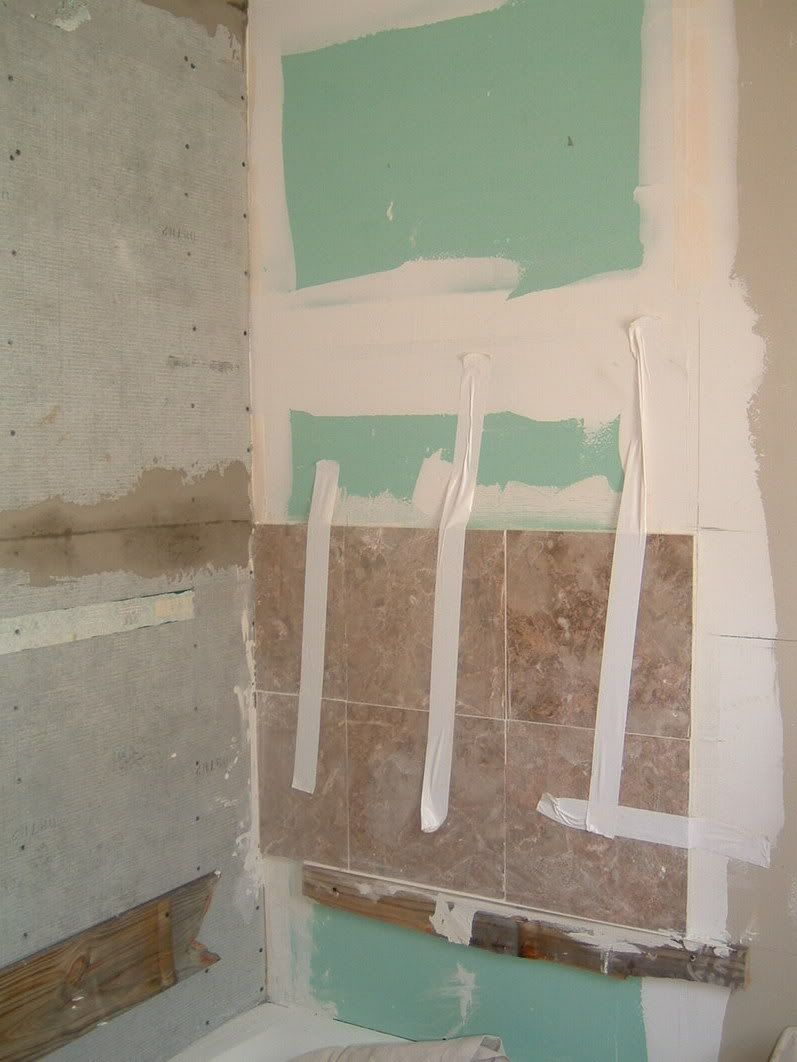
Well, after I installed the ledgerboards to keep the marble straight and keep it from slipping while it sets, I started with the marble.
You can probably see that I only installed cement board on two of the the three walls in the shower. I didn't do it on the far wall because
- then I would have to put it on that whole wall (even outside the tube) so that the wall is even; and
- I figured that there isn't a whole lot of water that will hit that back wall anyway.
In addition to the ledger board, you can see that I held the marble in place with duct tape until it dried. This is probably overkill, but I didnt' want to take any chances.
Well, my computer at home is acting up so I probably won't be able to post the finished pics until this weekend when I can hook my camera up to someone elses' computer. But these pics should hold you 'till them.
3 comments:
Awesome work in the bathroom! I have one question for you- how did you level the floor the 2.5" necessary? We just came back up from measuring the level of the basement floor, and found that we need to go up 1.25", but Quickrete Self-Leveling floor stuff only says that it can go to 5/8". Anything you can tell us would help us tremendously, b/c we plan to tackle this sometime this weekend or next weekend.
Well, you can't use the self-leveling stuff. I used the regular concrete stuff (I forget what it's called) that has the portland cement, sand and agregate allready in the bag.
Basically, you would cut a long piece of wood to the height you need (1.25') and lay it across where you want to put the cement. then you pour the cement and use another long piece of wood perpendicular to the first piece and "screed" the cement 'till its level.
If you are careful, or have a cheap plastic level, you can place the level on top of the board you are using to screed so that you can be sure of the level as you go.
If you get cement on it, though, be sure to clean it off right away. Once it dries, your level is just a piece of wood.
My tile is similar but in a less annoying color - it's like a smokey tan color which matches the tub, sink and toilet. Then there's beautiful tan built-in towel bar, toothbrush and soap holder and toilet paper dispenser. To top it off, I my guest bath is covered in gloriously disgusting paisley wallpaper that I swear has become one with the wall forever. Why did people in 1979 think this was a good idea??? What advice can you give me if I just want to update everything but not do major renovation? See my blog, My Roswell Home. Thanks!
Post a Comment